Topics
- Article
- App & Features
- Training & Exercise
WHOOP Training Zones: Where Do They Come From and What Do They Mean?

This week, WHOOP unveiled Weekly Performance Assessments, and in them, introduced WHOOP Training Zones.
Knowing how hard to push yourself each day is difficult. This week, WHOOP unveiled Weekly Performance Assessments, and in them, introduced WHOOP Training Zones. Understanding the relationship between Recovery and Strain can help guide your training in the right direction. Here we talk about where this feature comes from and how to use it to better unlock your potential.
Defining The Zones
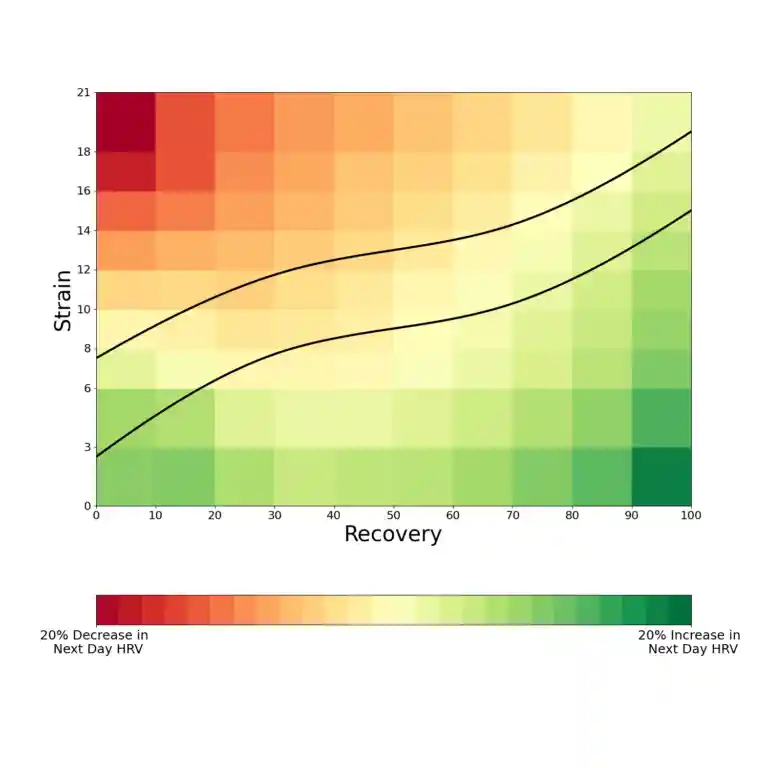
Each day, the WHOOP Recovery metric provides insight into how our bodies are likely to respond to various cardiovascular loads. To decode this relationship, we created the WHOOP Training Zones, which map Recovery and Day Strain into three zones. The boundaries between the zones, illustrated in the figure below, were developed by analyzing nearly a million days of Strain and Recovery data and their impact on next-day HRV collected over the last year. For each Recovery/Strain combination, we looked at the expected next-day change in HRV; in the figure, expected increases in HRV are shown in shades of green, with the greatest increase shown in the darkest green, and expected decreases in HRV are shown in red, with the greatest decrease shown in the darkest red. Yellow areas indicate little or no deviation from HRV baseline.
Interpreting This Feature
The labels given to each of the three zones describe the expected short-term impact of training in them; specifically, if they are expected to leave you more (“Restoring”), less (‘Overreaching”), or similarly (“Optimal”) ready to train compared to your baseline. It should be noted that what is optimized by the Optimal Zone — maximum fitness gains without carried fatigue — is not always what every athlete aims to optimize every day. While staying in the Optimal Training Zone allows one’s body to acutely recover from the day’s training stimulus, the appropriate zone for an athlete depends on his short- and long-term goals. Tapering--the act of acutely reducing training load to reduce fatigue prior to competition--increases performance, and typically places the athlete in the Restoring Zone. Spending too much time in that zone, however, will eventually lead to detraining and fitness loss. On the other end of the spectrum, training in the Overreaching Zone day after day can lead to burnout, non-functional overreaching/overtraining syndrome, or injury. But, sequencing brief periods of overreaching and recovery can create a supercompensation effect, and therefore can be a highly efficient way to train. In short, none of the training zones are inherently “good” or “bad.” Instead, the appropriateness of training in any given zone depends on your current goals.
Training Examples
Below are four hypothetical examples of training data, and some pointers from our Department of Analytics and Physiology on how to interpret them.
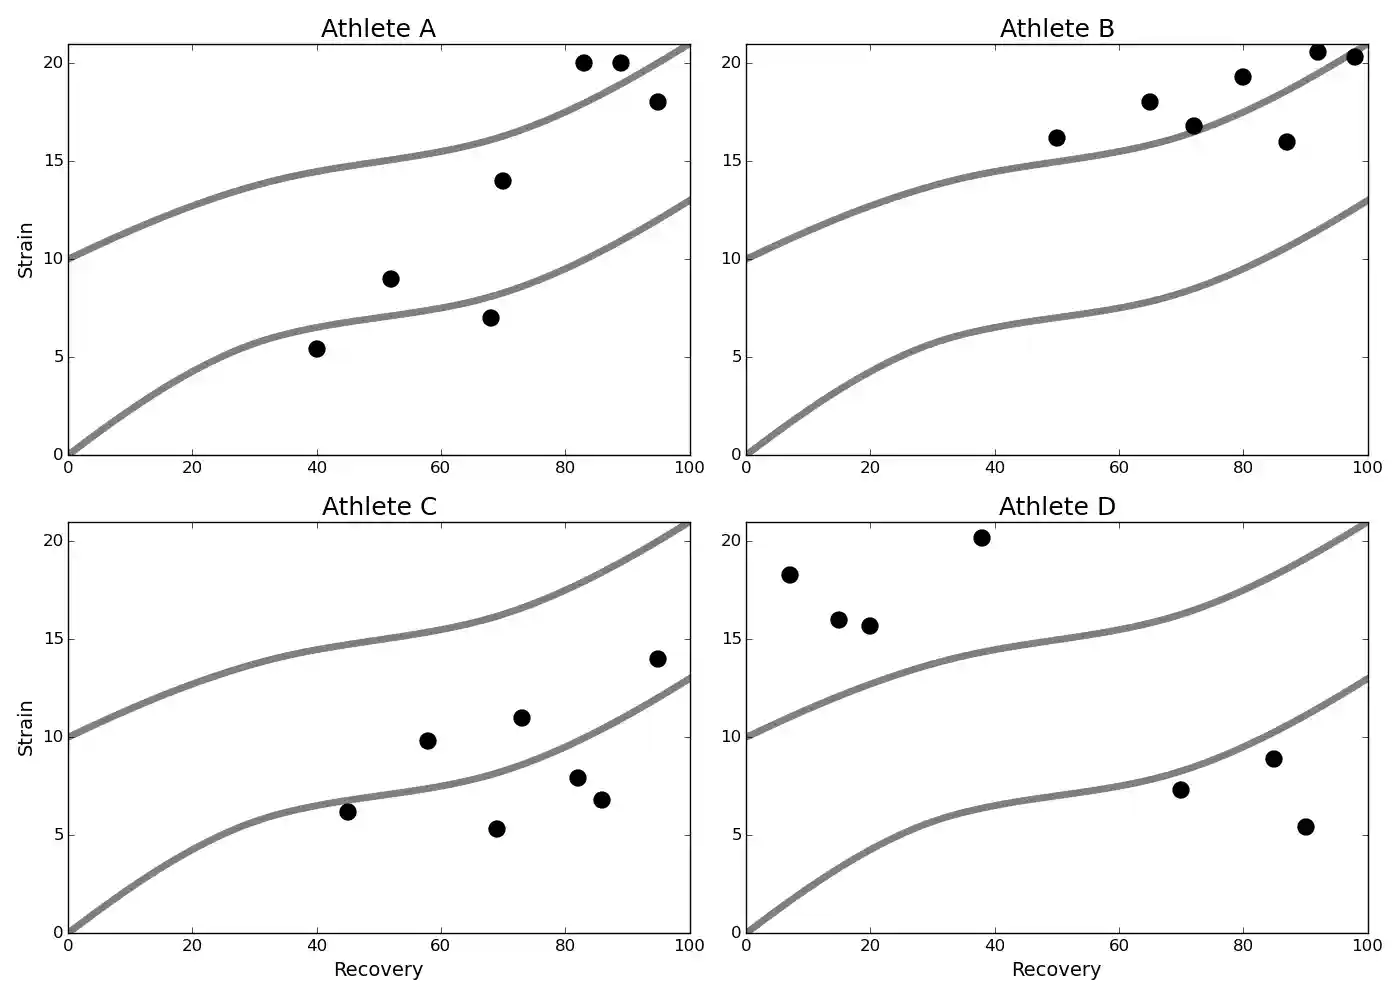
There are several notable differences between the four athlete’s training:
YOUR GOALS DETERMINE THE APPROPRIATE ZONE
If we were to find the “average” Training Zone of athletes A, B, and C, we would say athlete A falls into the Optimal Zone, athlete B into the Overreaching Zone, and athlete C into the Restoring Zone. None of these athletes are inherently training better or worse than another — it all depends on the athletes’ goals. If Athlete B intended to taper before a major competition, she would see that her goals are not aligned with her training. However, if Athlete B was in an overreaching phase of a training plan and is following that week with plenty of active recovery, she is right on track! Thus, each zone has both its advantages and disadvantages and will be appropriate at different times during a training plan.
HIGH STRAIN ON HIGH RECOVERY; LOW STRAIN ON LOW RECOVERY
Athlete D matched his highest Recovery with his lowest Strain, and his lowest Recovery with his second highest Strain. On the other hand, Athlete A matched her three highest recoveries with her three highest Strains, and her lowest Recovery with her lowest Strain. Even though athletes B and C are generally outside of the Optimal Zone, they still are able to log higher Strain on high Recovery days and lower Strain on low Recovery days. Studies have shown that HRV-based training, in which an athlete performs higher-intensity exercise when HRV increases and lower-intensity exercise (or rest) when HRV decreases results in larger fitness gains than training according to a fixed plan. The results of these studies support matching high Recovery with high Strain and low Recovery with low Strain. Athlete D should adapt his schedule so that he takes on higher Strain on days with higher Recovery.
HIGH RECOVERY AS A GOAL
Athletes with high Recovery are able to have higher Strain without venturing into the Overreaching Zone. Several days in Athlete D’s training could have been in the Optimal Zone had Recovery not been suppressed. Clearly, even with the same distribution of Overreaching, Optimal, and Restoring days, a sleep-deprived athlete with unhealthy behaviors that continually wakes up with low Recovery will likely achieve different fitness gains than a well-rested, healthy athlete with consistently high Recovery. To use the WHOOP Training Zones effectively, athletes should strive to wake up as recovered as possible. The WHOOP Training Zones are not meant to be interpreted as a daily Strain prescription, but rather as a tool to ensure that what you are doing to your body aligns with what you mean to be doing to your body. This feature allows you to action Recovery by selecting a daily Strain Target that optimizes your training efficiency and brings you closer to unlocking your potential.